


Description
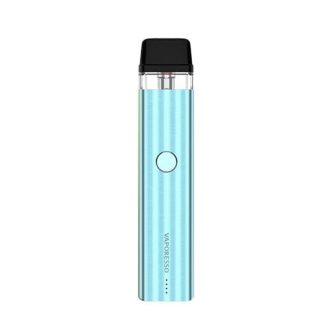
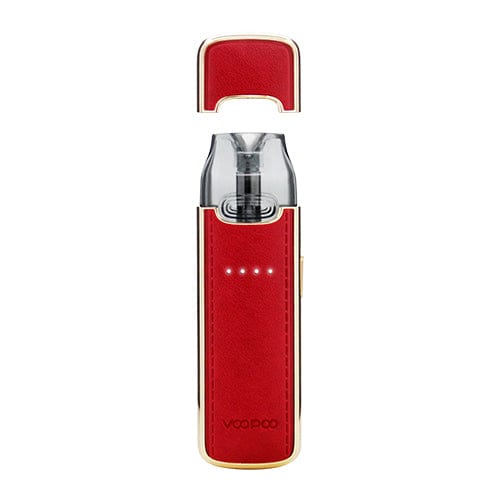
VMATE E 20W Pod Kit – VooPoo
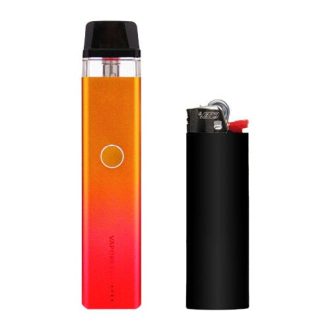
Discover the VooPoo VMATE E Kit — a powerhouse pod system designed to elevate your vaping experience with cutting-edge ITO taste innovation technology. Thanks to the advanced 5A freshness tech, every puff is packed with pure flavor and cleanliness, offering anti-light, anti-bacterial, anti-volatile, anti-oxidant, and anti-dust protection. This kit features an air-tight silicone ring and seal paired with a smart dual-hole leakage-proof design, ensuring a mess-free vape every time. Powered by a robust 1200mAh built-in battery and equipped with a standard 3ml e-juice capacity, the VMATE E Pod Kit lets you effortlessly switch between loose MTL and light MTL draws for personalized satisfaction. Compact, stylish, and ergonomic, this device fits comfortably in your hand and slips easily into your pocket for vaping on the move.
The kit includes two refillable pods compatible with a wide range of flavors, letting you tailor your vape to your taste preferences. Behind its sleek exterior lies an advanced chip delivering consistent performance with reliable safety features, making the VMATE E perfect for both beginners and seasoned vapers alike. With a maximum output of 20W, this device packs enough punch to satisfy your cravings without compromising portability or style.
Features & Specifications:
- Lightweight and Compact
- Max 20W Output
- Built-in 1200mAh Battery
- 3ml Vmate V2 Cartridge
- Integrated 0.7ohm or a 1.2ohm Coil
- Metallic and Leather Construction
- Adjustable Airflow
- Best for Nic Salt
- LED Indicator Lights
Package Includes:
- 1x VooPoo Vmate E Device
- 1x Vmate Cartridge V2 0.7ohm
- 1x Vmate Cartridge V2 1.2ohm
- 1x Type-C Cable
- 1x User Manual
Quick Links:
VooPoo Vmate Replacement Pods
Shop All Pod Kit Systems
Shop All VooPoo
VooPoo VMate Review
Instagram: @madecat_vapes
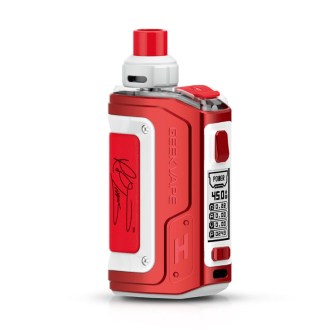
Specs
- Dimensions: 89mm x 47mm x 30mm
- Weight: 100g
- Material: Zinc Alloy
- Max Output: 200W
- Max Output Voltage: 7.5V
- Modes: Power/TC (Ni200/Ti/SS)/TCR
- Resistance Range: Power – 0.05-3.0ohm / TC – 0.05-1.0ohm
- Temperature Range: 200°F-600°F / 100°C-315°C
- Battery: Dual 18650 (split battery chamber)
- Chip: Updated Gene.Fan Chipset
Current color options include Surf Blue, Emerald Green, Camouflage Red, Wood, Waterfall Black, Rock Black, Red, and Camouflage Green in both Stainless and Pewter frames.
Contents
- VMate 200W TC Mod
- USB Cable
- User Manual
- Warranty Card
- GENE Chip Card
Operation
- 5 clicks on. 5 click off.
- 3 clicks to scroll through operation mode (Wattage/TC)
- 4 clicks in TC mode to adjust watts
- Hold + and – to enter menu
- Hold + and fire button to lock/unlock device
VMate
The VooPoo VMate is a super lightweight and sleek looking device and comes in a variety of battery door cover accent pieces for some added styling. Housing an upgraded version of the GENE chip (GENE.Fan), the VMate is a contender for my top favorite devices this year. But I’m getting ahead of myself. Let’s jump off this review and start at the best place possible: the top.
Top/510: The top of the VMate has a contoured 510 platform with a beefy 510 plate. The platform will fit up to 25mm attys without an issue, but anything over 25mm is going to overhang. If the platform didn’t have the contour you could probably get away with 26mm-28mm, but I like the contour and think it helps with the sleekness of the design. Threading on the 510 is really smooth and the positive pin is spring loaded.
Buttons: Also on the top of the device you’ll find all the buttons. They are on either side of the mod, with the fire button on one side (taking up the whole side) and the +/- buttons on the opposite side (each taking up half of the side with a separator between them). The buttons start at the top of the VMate and curve down the sides. Buttons cannot be pressed down from the top, and are instead activated by pushing in on them from the sides. I feel like this configuration is better suited for the device and feels more natural. Buttons are nice and clicky and responsive.
With the way the buttons are done, it might be easy for you to mistake one side with the other and start adjusting your watts or temp when you meant to fire it AT first, especially if you aren’t looking at your device or haven’t been using it for long. I found that it’s fairly easy for me to determine which side the fire button is on just by holding the device in my hand as the screen juts out from the mod more than the plate on the back allowing me to easily identify how I need to hold it to fire it with my index finger. That’s another thing, if you’re left handed, you’ll likely be firing it with your index finger unless you want to palm the screen. Similarly, if you’re right handed, you’ll be firing it with your thumb for the same reason. This is really a matter of personal preference for the individual and I feel it is comfortable to fire the VMate either way.
Screen/Menu: On the front of the device is a large glass plate that is contoured our from the device and that houses the screen. The screen is not the entire height of the device and only really takes up about half of that real estate. One thing to note about the screen, it’s a finger print magnet as well as the glass on the backside of the mod. You’re not going to find a color screen here as the screen on the VMate is very similar to the one found on the Mojo. In fact, the UI is pretty exact to how it is on the Mojo, so pardon my copy/paste: The menu system is very simplistic and allows you to select Power Mode or Memory Mode, lock your device, view device information, see firmware version and, while in TC mode, set your ohms and can change the TCR values. The values for TCR seem to be custom VooPoo values specific to the device, so read the manual for information on changing that as the values are not similar to most devices.
Battery Doors/Tray: The battery doors on the VMate are the main accent pieces of the device and come in some really nice looking configurations. They are made of plastic, though, and not resin as you might expect. This really isn’t a huge deal as it helps to keep the weight of the device to a minimum. On the backside of each battery door towards the top is a little indention cut into it to help you remove the door. Doors are held in via a notch and grove at the bottom of the door and a magnet at the top. Doors have to be inserted bottom first as the notch must be
| Color | Classic Black (Sold out), Classic Blue (Sold out), Classic Brown, Green Inlaid Gold, Red Inlaid Gold, White Inlaid Gold (Sold out) |
|---|